Wednesday, June 30, 2010

Altering KRAFT Envelopes - Maya Road

I think I need to buy more of these Maya Road kraft envelopes. They are pretty enough alone, but because I have some background stamps at my disposal and some other distressing supplies, I thought I would create a mini tutorial on altering these envelopes to create a nice FOCAL point for your layouts or cards.

SUPPLIES:
Background Stamp (Unity Stamp Co. Vintage Chic Kit)
Liquid Adhesive
Glitter (Art Glitter Institute – Angel Dust)
Stickles: Cinnamon
Ink: Color Queue (Chocolate & Blueberries)
Kraft Envelope (Maya Road)


STEP 1:
Ink around the edges of the envelope with brown ink.


STEP 2:

Open envelope and stamp script background (Unity Stamp Co) in black ink.


STEP 3:
Apply liquid glue (clear drying) to the top of envelope, kind of like an icicle pattern.


STEP 4:
Apply glitter to the glue (angel dust).  Shake off excess glitter.


STEP 5:
Although the glitter looks white, it will dry clear. Apply Cinnamon Stickles around the white glitter. Let dry.  Apply to layout.


Here is another example of stamping a background text onto the envelope (both the main and flap).  Inked the edges with a darker brown ink, and applied a green acrylic paint.  The flowers add a nice touch (Maya Road), and a Prima Pebble was added for detail.  The date stamp is 7 Gypsies and the flourishes are Basic Grey.


And here is the whole layout.


Here is another envelope treated with paper strips, stamps, ink, a Prima pebble, and paint.


Hope you can go out and buy some of these fabulous envelopes and find new ways to alter them - and then come and tell me!

Tuesday, June 15, 2010

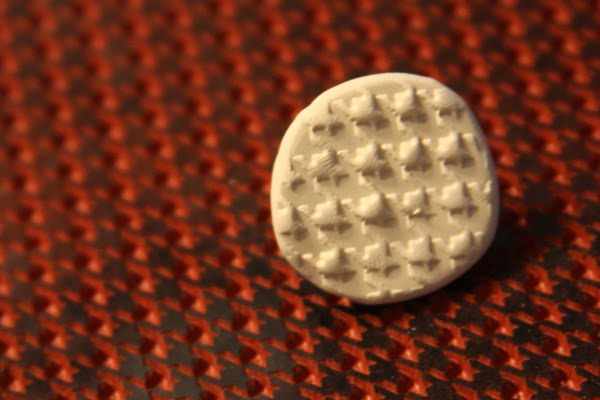
CLAY BRADS - Make & Bake!

This is a fun tutorial on making your own FUNKY brads out of FIMO (or similar product).   You can use these on layouts, cards, for the centers of flowers, etc... The possibilities are endless. 

SUPPLIES:
WHITE FIMO/SCULPEY CLAY
ALCOHOL INKS or SMOOCH or ACRYLIC PAINT
SMALL PATTERNED STAMPS (HOUNDSTOOTH)
STAZ-ON
BRADS

Step 1:
Roll clay into 1/2" ball.


Step 2:
Take ball of clay and start covering the large brad.


Step 3:
Cover brad and pinch clay.


Step 4:
Flatten clay on the under side of brad (kind of like a mushroom).


Step 5:
Position brad onto a deeply etched rubber stamp.


Step 6:
Press clay firmly into stamp so that it is flat like a pancake.


Step 7:
Pull up clay gently.


Step 8:
Start molding clay back into a mushroom shape by pressing in the sides, being careful not to touch the pattern (top of the brad).


Step 9:
Bake according to instructions on package.


Step 10:
Colour your brads with alcohol ink (mushroom).


Step 11:
To really make the pattern POP, apply black Staz-on Ink to the raised portion only.


Other ideas:  SMOOCH for color.


Plum Alcohol Ink for colour....


Make lines in the clay with toothpicks....


Make holes in the clay, apply Silver Alcohol Ink for colour....


I hope you enjoyed this tutorial and would love to see your projects!

Lesley Langdon Tutorials

Thursday, June 10, 2010

Variated Petals - Playing with WHITE Flowers!

With the creation of shimmering mists such as GLIMMER MIST or SHIMMERZ SPRITZ, a whole new world has been opened to us in the crafting world.  You can pretty much add colour to anything that will absorb water.

I have been purchasing CREAM or WHITE ribbons, papers, and flowers with misting in mind.

Below, is a QUICK tutorial on getting some nice blended colours onto your WHITE flower.  You can apply this to any colour scheme, provided your mist, ink, and stickles match.

SUPPLIES:
Patina Glimmer Mist
Broken China Distress Ink REFILL Bottle
Aqua Stickles
Prima Flower


Step 1:
Mist your flower with a good 5 prays of mist.

Step 2:
WHILE THE FLOWER IS STILL WET, directly from the dropper of your refill ink, run the dropper along the tops petals. 


Step 3:
Immediately spray the flower again with mist, this will make the flower very wet, and will allow for the ink and mist to blend.  For a lighter blue flower, apply less Broken China ink, perhaps use a fine tip paint brush instead of the dropper.


Step 4:
While still wet, apply Aqua Stickles to the flower petals tops and middles for some shimmer (THIS IS OPTIONAL).


Step 5:
Watch it blend as it dries and use it on a project!


Have fun crafting!

Tuesday, June 8, 2010

DRAWING AND PAINTING ON TEXT - CARD

This tutorial is pretty straight forward, you just have to use the right inks and colouring supplies.

SUPPLIES FOR TEXT DRAWING:
Background Text Stamp (CHF Vintage Text)
Waterproof Black Dye Ink (Memories by Stewart Superior)
Waterproof Black Pen (Copic Multi-liner)
Alcohol Ink (Red Pepper by Ranger)
Prism Simply Smooth Natural Paper (or similar)
Water
Paint Brush

Instructions:

1. Stamp any background text in black dye ink (waterproof) or use an old book page.


2. Draw a simple dress with waterproof black pen.

3. Make a little boat out of tin foil for your alcohol ink. Dilute 5 drops of red alcohol ink with 1 tbsp of water and with paint brush, colour the dress, shading the left side and creases.  The text will show through. You can also water down acrylic paint and get a similar result.

4. Die cut the image in a circle.

5. With cut n' Dry Foam, apply Lettuce Adirondack ink around the edges, working your way into the center.

6. Die cut glitter felt (scalloped circle), and adhere image.

7. Design your card and apply image and sentiment.

If I was an artist and could actually draw something more than a dress, I would!!!  You can also try printing images onto the text and see what happens.

Monday, May 31, 2010

Creating Marble Chipboard with Paint


I picked up these plain CHIPBOARD alphabets from Kaisercraft from SCRAPBOOK STAR. They come in all shapes and sizes, UPPER CASE to use as nice BIG stand out initials and smaller one word titles and, and LOWERCASE to use in all circumstances.

I’ve had a chance to play around with these chipboard alphabets and all I can say is that they are great because of the fact that they are a clean slate from which to play. You can make them any colour, use products such as ink, embossing powder, glitter, UTEE, paint, or cover them with patterned paper.

Here is just one way you can alter your chipboard alphabets by creating a marble appearance.


Step 1:
Gather your supplies.
• Kaisercraft Chipboard Letters
• Ranger Paint Dabbers (Pool and Bottle)
• Cream coloured acrylic paint
• Paint Brush
• Glossy Coat (optional)


Step 2:
Apply a coat of Bottle paint by dabbing it onto the chipboard. Because of the scrubby applicator on the Ranger Dabber, you will get some texture on the chipboard. For a smooth, non-textured look, you can use a swiping motion.

 
Step 3:
Apply small dabs only of the light colour paint (POOL), until you get the desired look. If you applied too much, start over again with the darker colour (BOTTLE) and try again. Paint is forgiving this way!

Step 4:
With a paint brush, apply small strokes to the outer edges of the chipboard letter, going from the outside, in. OPTIONAL – apply a spray coating that will make your letters glossy, Mod Podge, or apply Ranger’s Glossy Accents.

Supplies:
Patterned Paper – KAISERCRAFT Rosa (Gypsy Sisters), Nadia (Gypsy Sisters)
Chipboard Alphabets – KAISERCRAFT Large Lowercase
Mini Alpha Stickers – KAISERCARFT Black
Paint - RANGER and LIQUITEX
Triple Thick Glaze (applied to letters on layout)
Thanks for stopping by!  Let me know if you end up trying this - I would love to see your results.

Lesley

Friday, May 28, 2010

Drip, Drop, and Run Technique

OK - this is for all you Distress Ink Fans. I envisioned that this technique would work before I tried it, knowing how these inks react with water. It is KEY to use watercolor paper with this technique, as it can withstand the amount of water you will subject it to.

Supplies:
Ranger Distress Inks (Broken China, Peeled Paint, Dusty Concord)
Watercolor Paper 140 (Pound)
Water

Instructions:
1. Cut watercolor paper 9" x 9".
2. With ruler and pencil, create 3" squares to a total of 9 squares.
3. Take 3 coordinating Distress Ink colors and apply the pads direct to paper, varying be sure to place different colors beside each other.


4. In the sink, apply water to the top of the paper, letting the ink from the first squares drip to the middle and bottom squares.
5. Turn upside down, and repeat step 4.
6. Re-apply ink to the same squares when the paper is still wet.
7. Now turn the paper sideways and apply water, let run down.

8. Now turn the paper again to the last side and apply water, let run.
9. Splat drops of water onto the paper.
10. Let dry and create your project!

If you prefer, you can cut up these squares and use them for cards and all sorts of little projects!

If you try this - I would love it if you would share your creation with me!

Now go and Get MESSY!